TEST DIRECTIONS FOR OVULATION (LH) TESTS
WHEN TO START TESTING Determine the Length of Your Menstrual Cycle.
Your Menstrual Cycle Length is the number of days from the first day of your period (menstrual bleeding) to the last day before your next period starts. Think back over the last few months to decide what your usual cycle length has been.
Circle your usual cycle length on the WHEN TO START CHART below. Select the number directly underneath. Starting the first day of your last period, count ahead the selected number of days on your calendar. This is the day you should begin testing.
WHEN TO START CHART
Circle Your Usual Cycle Length___________________
21 22 23 24 25 26 27 28 29 30 31 32 33 34 35 36 37 38
6 6 7 7 8 9 10 11 12 13 14 15 16 17 18 19 20 21
Count ahead this many days STARTING WITH THE FIRST DAY of your LAST period.
Note: If you are unsure about your cycle length, you may want to use your shortest cycle length when reading the chart. If you do this, you may need to test for more than 5 days.
Example: My usual cycle length is 28 days. My last period started on the third. The “When to Start Chart” shows that I will count ahead 11 days beginning with the third. When I count 11 days ahead on the calendar, I find that I will collect and test my urine starting on the 13th. (See “Sample Calendar” below).
Sun. |
Mon. |
Tue. |
Wed. |
Thu. |
Fri. |
Sat. |
|
1 |
2 |
(3) |
4 |
5 |
6 |
7 |
8 |
9 |
10 |
11 |
12 |
<13> |
14 |
15 |
16 |
17 |
18 |
19 |
20 |
21 |
22 |
23 |
24 |
25 |
26 |
27 |
28 |
29 |
30 |
31 |
|
|
|
( )--First day of your last period < >--Begin testing with the LH One Step Ovulation Test Device DIRECTIONS FOR USE
Allow Test Device & Urine Specimen to reach room temperature (15-300C) prior to testing.
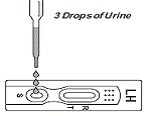
1. Determine the day you will begin testing. (See the above section: “WHEN TO START TESTING”). 2. Remove the test device from the sealed pouch and use it as soon as possible. 3. Place the test device on a clean and level surface. Hold the dropper vertically and transfer 3 full drops of urine (approx. 100μL) to the specimen well (S) of the test device, and then start the timer. Avoid trapping air bubbles in the specimen well (S). See illustration below. 4. Start the timer and wait for the red line(s) to appear. The result should be read at 5 minutes. Do not interpret the result after 10 minutes.
SAMPLE TEST & RESULTS:
|
POSITIVE: Two lines are visible and the Test Line (T) is the same as or darker than the Reference Line (R). This indicates that you will probably ovulate within 24-36 hours.
|
|
NEGATIVE: Two lines are visible, but the Test Line (T) is lighter than the Reference Line (R), or there is no Test Line. This indicates that no LH surge has been detected and you should continue daily testing. |
|
INVALID: Reference Line fails to appear. Insufficient specimen volume or incorrect procedural technique are the most likely reasons for an invalid result. Review the procedure and repeat the test with a new test device. If the problem persists, discontinue using the test kit immediately and contact us Toll Free at 1-866-937-8483 |


LIMITATIONS:
- The One Step Test Device provides only a qualitative, preliminary analytical result. A secondary analytical method must be used to obtain a confirmed result. Gas Chromatography/Mass Spectrometry (GC/MS) are the preferred confirmatory methods.
- It is possible that technical or procedural errors, as well as other interfering substances in the urine specimen may cause erroneous results.
- A Positive Result indicates presence of the drug or its metabolites but does not indicate level of intoxication, route of administration or concentration in urine.
- A Negative Result may not necessarily indicate drug-free urine. Negative Results may be obtained when drug is present but below the cutoff level of the test.
Disclaimer: DrugTestStrips.com products have been found to be highly accurate and are guaranteed against defects in labeling & packaging until the stated expiration date. Regardless, DrugTestStrips.com will not be held accountable/liable for the outcome of ANY result arising from the use of DrugTestStrips.com products. DrugTestStrips.com sole obligation in the event of ANY damage/result/defect is to replace it with a comparable new test strip product. Except for such replacement, the sale, transfer, or handling of these drug test products are without warranty, condition or liability even though the damage/result/defect is due to negligence or other fault.


